# Use a custom connector
Import the PDF Blocks connector from GitHub as a custom connector to use the newest actions and parameters before they reach the published connector.
The published **PDF Blocks** connector in Power Automate is certified by Microsoft,
so new actions and parameters reach it on Microsoft's review cadence rather than
ours. When you need a capability that is already in the connector definition but
has not rolled out to the published connector yet — the split and reorder actions,
[page selection](/docs/power-automate/extract-pages-from-pdf), or the encryption
options — you can install the latest definition yourself as a **custom connector**
by importing it from GitHub.
The connector definition is open source and lives in Microsoft's
[PowerPlatformConnectors](https://github.com/microsoft/PowerPlatformConnectors)
repository. Power Automate can build a custom connector straight from it, so you
never copy files by hand.
A custom connector lives in a single Power Platform environment and is not
certified. It works exactly like the published connector — same actions, same
API key — but you maintain it: re-import to pick up later updates. When the
published connector catches up, you can switch your flows back to it.
## Before you start
- A paid Power Automate plan (per-user or per-flow), the same requirement as the
published connector.
- Permission to create custom connectors in your environment. If you don't see
**Custom connectors**, ask your Power Platform administrator.
- Your PDF Blocks API key, ready for when you create the connection. See
[Getting started](/docs/power-automate/getting-started) if you don't have one.
## Import the connector
In [Power Automate](https://make.powerautomate.com), expand the left menu, choose
**More**, and open **Custom connectors**. (You can also reach the same page from
the Power Apps maker portal under **Discover all → Custom connectors**.)
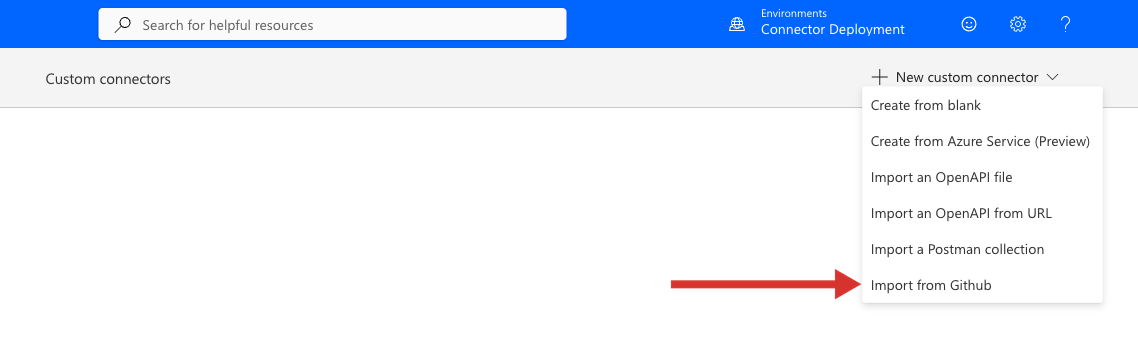
Select **+ New custom connector**, then choose **Import from GitHub**.
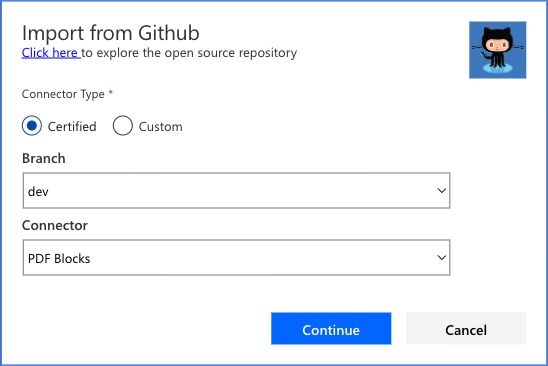
 In the **Import from Github** dialog:
- Set **Connector Type** to **Certified** — this reads from the certified
connectors folder of the open-source repository, where PDF Blocks lives.
- Choose a **Branch**. Pick the branch that carries the update you need (for
example `dev` for the latest, or a release branch for a pinned version).
- Set **Connector** to **PDF Blocks**.
Select **Continue**.
In the **Import from Github** dialog:
- Set **Connector Type** to **Certified** — this reads from the certified
connectors folder of the open-source repository, where PDF Blocks lives.
- Choose a **Branch**. Pick the branch that carries the update you need (for
example `dev` for the latest, or a release branch for a pinned version).
- Set **Connector** to **PDF Blocks**.
Select **Continue**.
 Use the **Click here to explore the open source repository** link in the
dialog to browse the exact definition before importing.
Power Automate loads the connector's definition into the editor. You don't need
to change anything — step through the **General**, **Security**, and
**Definition** tabs to review it if you like, then select **Create connector**
in the top right. Give it a recognizable name (for example *PDF Blocks Next*) so
you can tell it apart from the published connector.
The first time you add an action from your custom connector to a flow, Power
Automate asks for the same connection parameters as the published connector: a
**Connection Name**, your **API Key**, and an optional **Server Hostname**. See
[Getting started](/docs/power-automate/getting-started#step-2-create-a-connection)
for what each one means.
In a flow, add an action and search for the name you gave your custom connector.
Its actions — including the ones not yet in the published connector, such as
[Split a PDF by page count](/docs/power-automate/split-pdf-by-page-count) and
[Reorder the pages of a PDF](/docs/power-automate/reorder-pages-of-pdf) — appear
alongside everything else, ready to configure.
## Keeping it up to date
A custom connector is a snapshot of the definition at import time. When we ship
more updates, repeat **Import from GitHub** on the same connector (or re-import and
recreate) to refresh it. Because the custom connector and the published connector
are independent, you can keep both installed and move each flow over when you're
ready.
## Related
Set up your first PDF Blocks connection and API key.
Start with a core action once your connector is installed.
Use the **Click here to explore the open source repository** link in the
dialog to browse the exact definition before importing.
Power Automate loads the connector's definition into the editor. You don't need
to change anything — step through the **General**, **Security**, and
**Definition** tabs to review it if you like, then select **Create connector**
in the top right. Give it a recognizable name (for example *PDF Blocks Next*) so
you can tell it apart from the published connector.
The first time you add an action from your custom connector to a flow, Power
Automate asks for the same connection parameters as the published connector: a
**Connection Name**, your **API Key**, and an optional **Server Hostname**. See
[Getting started](/docs/power-automate/getting-started#step-2-create-a-connection)
for what each one means.
In a flow, add an action and search for the name you gave your custom connector.
Its actions — including the ones not yet in the published connector, such as
[Split a PDF by page count](/docs/power-automate/split-pdf-by-page-count) and
[Reorder the pages of a PDF](/docs/power-automate/reorder-pages-of-pdf) — appear
alongside everything else, ready to configure.
## Keeping it up to date
A custom connector is a snapshot of the definition at import time. When we ship
more updates, repeat **Import from GitHub** on the same connector (or re-import and
recreate) to refresh it. Because the custom connector and the published connector
are independent, you can keep both installed and move each flow over when you're
ready.
## Related
Set up your first PDF Blocks connection and API key.
Start with a core action once your connector is installed.